Remove Background Product Photos: Methods Compared
Compare every way to remove background from product photos — Photoshop, free online tools, and AI batch options ranked by speed, cost, and quality results.
TL;DR
There are six main ways to remove backgrounds from product photos: manual tools (Photoshop pen tool, magic wand), free online tools (Remove.bg, Canva, PhotoRoom), mobile apps, and AI-powered batch tools. Manual methods give pixel-perfect control but take 5-20 minutes per image. Free online tools handle simple products in seconds but struggle with hair, glass, and transparent objects. AI batch tools combine speed with quality and cost $0.10-0.50 per image at scale. For most e-commerce sellers, the best approach is an AI tool that removes the background and generates a complete product scene in one step.
Key Takeaways
- Photoshop pen tool gives the cleanest edges but takes 10-20 minutes per image and requires real skill
- Free online tools like Remove.bg handle 80% of products well enough, but fail on hair, glass, and transparent items
- Mobile apps are convenient for quick social media posts but lack the resolution for marketplace listings
- AI-powered batch tools process hundreds of images with consistent quality at $0.10-0.50 per image
- Amazon, Etsy, and Shopify all require or strongly recommend white backgrounds on main product images
- Common mistakes — halos, lost edges, color fringing — are avoidable with the right method for your product type
- Products with hair, transparency, or reflective surfaces need specialized approaches
Why Background Removal Matters for E-commerce
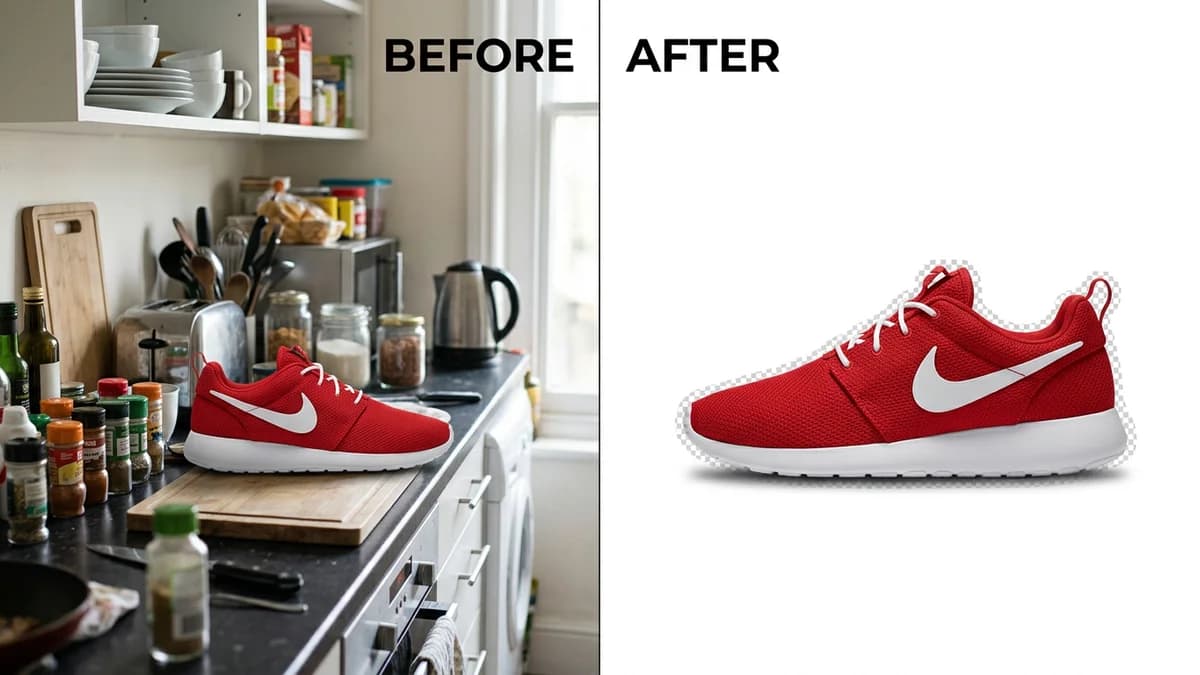
Background removal is the single most common image editing task in e-commerce. Every major marketplace has a version of the same rule: your main product image needs a clean, white background.
Amazon requires pure white (RGB 255, 255, 255) on main images. Etsy strongly recommends it for search visibility. Shopify stores convert better with clean backgrounds. eBay listings with white backgrounds get more clicks. For the full rundown of Amazon's specific rules, see our Amazon product image requirements guide.
Beyond compliance, clean backgrounds serve a practical purpose. They eliminate distractions, let the product speak for itself, and create visual consistency across your catalog. A listing where every image has the same clean white background looks professional. A listing where images have different colored walls, kitchen counters, and carpet backgrounds looks amateur.
The question is not whether to remove backgrounds. It is which method gives you the best results for your time and budget.
Method 1: Photoshop Pen Tool (Manual Path Selection)
The pen tool is the professional standard. Every product photographer and retoucher knows it. You click around the product to create a precise vector path, then use that path to mask everything outside it.
How It Works
- Open your image in Photoshop.
- Select the Pen Tool (P).
- Click point by point around the product edge, using Bezier curve handles to follow curves.
- Close the path, then convert it to a selection (right-click > Make Selection).
- Invert the selection and delete the background, or create a layer mask.
- Place a white layer behind the product.
Pros
- Pixel-perfect edges. You control every point on the selection boundary. No algorithm guesses wrong.
- Works on any product. Glass bottles, hair accessories, mesh fabrics — the pen tool does not care what the product is.
- Non-destructive workflow. Using layer masks means you can refine the edge anytime without losing the original image data.
Cons
- Slow. A simple rectangular product takes 5-10 minutes. A complex product with irregular edges takes 15-25 minutes. A product with fine hair or fringe can take 30+ minutes.
- Requires Photoshop ($22.99/month). Adobe's subscription model means ongoing cost even if you only use it for background removal.
- Steep learning curve. Using the pen tool well takes weeks of practice. Beginners create jagged paths with visible corner points instead of smooth curves.
Best For
Professional retouchers, photographers editing hero images for premium brands, and anyone who needs flawless edges on a small number of images.
Not Ideal For
Sellers processing more than 20 images per week. The time cost adds up fast — 50 images at 15 minutes each is over 12 hours of manual work.
Method 2: Photoshop Magic Wand and Quick Selection
These are Photoshop's automated selection tools. Instead of manually tracing the edge, you click on the background and the tool selects pixels of similar color.
How It Works
- Open your image. Click the Magic Wand Tool (W).
- Click on the background area. The tool selects contiguous pixels within a tolerance range.
- Adjust the tolerance (higher = more lenient selection, lower = more precise).
- Hold Shift and click additional background areas the first click missed.
- Delete the selection or apply a layer mask.
The Quick Selection tool works similarly but uses a brush — you paint over the background and the tool detects edges automatically.
Pros
- Fast for simple backgrounds. If your product was shot on a solid-color background with strong contrast, the magic wand selects the background in one click.
- No tracing skill needed. Click-based rather than path-based, so beginners can get acceptable results quickly.
Cons
- Unreliable on complex backgrounds. If your background has multiple colors, textures, or shadows, the magic wand selects the product along with the background.
- Rough edges. The selection boundary follows pixel patterns, not smooth curves. You often get jagged edges that need manual cleanup.
- Struggles with similar colors. A white product on a white background? The magic wand cannot tell them apart. Neither can Quick Selection.
Best For
Products shot on a solid, high-contrast background — a dark product on a light background, or vice versa. Quick edits where "good enough" is acceptable.
Not Ideal For
Products where the background and product share similar colors or tones. Products with soft or blurred edges.
Method 3: Free Online Tools
Several web-based tools offer one-click background removal at no cost. These use AI models trained on millions of product and portrait images.
Remove.bg
The most popular free background removal tool. Upload an image, get a transparent background in 5-10 seconds.
- Free tier: Unlimited previews, but downloads are limited to 0.25 megapixels (roughly 500x500). Full resolution costs credits ($0.20-0.90 per image depending on volume).
- Quality: Excellent on standard hard goods. Handles most products cleanly with smooth edges.
- Weakness: Struggles with thin wires, fine mesh, and transparent objects. Hair accessories get better results than many competitors, but still lose fine strands.
Canva Background Remover
Built into Canva's editor. Upload a photo, click "BG Remover," and the background disappears.
- Free tier: Background remover requires Canva Pro ($12.99/month) or a free trial.
- Quality: Good for simple products. Integrates with Canva's design tools so you can immediately place the product on a new background.
- Weakness: Less precise than Remove.bg on complex edges. Not designed for batch processing.
PhotoRoom
Designed specifically for e-commerce product photos. Removes backgrounds and offers template scenes.
- Free tier: Limited resolution with watermark. Pro plan at $9.99/month.
- Quality: Strong on product photos specifically. Offers "instant background" templates for marketplace-ready images.
- Weakness: Templates can look generic. Limited control over shadow and reflection placement.
Photopea
A free browser-based Photoshop clone. Has all of Photoshop's selection tools (magic wand, quick selection, pen tool) without the subscription.
- Free tier: Fully functional with ads. No watermarks, no resolution limits.
- Quality: Identical to Photoshop — depends on your skill with the tools.
- Weakness: Same manual effort as Photoshop. No AI-powered one-click removal.
Speed and Cost Summary for Free Tools
| Tool | Speed | Free Tier Resolution | Paid Price | Batch Support | |------|-------|---------------------|------------|---------------| | Remove.bg | 5-10 sec | 500x500 | $0.20-0.90/image | Yes (API) | | Canva | 5-10 sec | Full (Pro only) | $12.99/mo | No | | PhotoRoom | 5-10 sec | Low + watermark | $9.99/mo | Limited | | Photopea | Manual (5-20 min) | Full | Free | No |
Method 4: Mobile Apps
If you shoot product photos on your phone, you can remove backgrounds without transferring to a computer.
Popular Mobile Apps
- PhotoRoom (iOS/Android) — Same AI as the web version. Shoot a photo, remove background, apply templates, export. The mobile experience is polished.
- Remove.bg (iOS/Android) — Upload from camera roll, get transparent background. Same free tier limitations as the web version.
- Background Eraser (Android) — Manual eraser tool with auto-detection. Free with ads.
- Magic Eraser (iOS) — Similar manual approach with some automation. Free tier available.
Pros
- Shoot-and-edit in one device. No file transfers, no computer needed.
- Instant results for social media. Good enough for Instagram, TikTok, and quick promotions.
Cons
- Resolution limits. Phone screens and mobile apps often compress output images. A photo that looks sharp on your phone may be too low-resolution for Amazon's 1600px+ requirement.
- Limited precision. Refining edges on a small phone screen is difficult. You cannot zoom in to check for halos or lost details the way you can on a desktop.
- Not suitable for batch work. Processing products one at a time on a phone is tedious beyond a handful of images.
Best For
Sellers who need quick images for social media, popup shops, or testing product concepts before investing in professional photos.
Not Ideal For
Marketplace listings that require high resolution and pixel-perfect edges. Anyone processing more than 10 images.
Method 5: AI-Powered Batch Tools
This is the newest category, and it is where the industry is heading. AI batch tools do not just remove backgrounds — they generate complete product scenes with studio-quality lighting, shadows, and composition.
How They Work
- Upload one or more product photos (some tools accept hundreds at once).
- Select your output style: white background, lifestyle scene, flatlay, or custom.
- The AI removes the existing background, analyzes the product's shape and material, and renders it into the selected scene with proper lighting and shadows.
- Download finished images ready for your marketplace listing.
The key difference from free online tools is that these are designed for scale. They process hundreds of images with consistent quality, and the output is not just a transparent cutout — it is a finished, marketplace-ready product photo.
Cost and Speed
| Scale | Typical Cost | Typical Time | |-------|-------------|-------------| | 1 image | $0.10-0.50 | 30-60 seconds | | 50 images | $5-25 | 25-50 minutes | | 500 images | $50-250 | 4-8 hours |
For a detailed comparison of AI product photo tools and pricing, see our best AI product photo tools roundup.
Pros
- Speed at scale. Processing 500 product images manually would take weeks. AI handles it in hours.
- Consistent output. Every image gets the same lighting, shadow style, and composition. Your catalog looks uniform.
- Beyond background removal. You get a complete product photo, not just a cutout. The AI adds realistic shadows, reflections, and environmental context.
- No design skills needed. The AI handles composition, lighting, and color balance automatically.
Cons
- Less control over fine details. You cannot manually adjust individual pixels on the selection edge.
- Subscription or per-image cost. Not free, though far cheaper than manual retouching at scale.
- Quality varies by product type. Hard goods (bottles, boxes, electronics) get excellent results. Soft goods, hair accessories, and transparent products may need review.
Best For
E-commerce sellers with 20+ products who need marketplace-ready images fast. Brands that launch new products frequently and cannot wait days for each batch of images. For the full comparison of AI versus traditional methods, read our AI vs traditional product photography guide.
Method Comparison Table
Here is every method side by side, comparing what matters most for e-commerce sellers.
| Method | Speed per Image | Cost per Image | Edge Quality | Batch Capable | Skill Required | Best Product Types | |--------|----------------|---------------|-------------|---------------|---------------|-------------------| | Photoshop Pen Tool | 10-25 min | $22.99/mo (subscription) | Excellent | No | High | All (if you have time) | | Magic Wand / Quick Select | 2-5 min | $22.99/mo (subscription) | Fair | No | Medium | High-contrast backgrounds | | Remove.bg | 5-10 sec | Free (low-res) / $0.20+ | Good | Yes (API) | None | Standard hard goods | | Canva | 5-10 sec | $12.99/mo | Good | No | None | Simple products | | PhotoRoom | 5-10 sec | $9.99/mo | Good | Limited | None | E-commerce products | | Mobile Apps | 10-30 sec | Free-$5/mo | Fair | No | Low | Social media images | | AI Batch Tools | 30-60 sec | $0.10-0.50 | Very Good | Yes | None | All product types at scale |
Marketplace White Background Requirements
Different marketplaces have different standards for background color. Here is what each requires for the main product image.
| Marketplace | Background Requirement | Enforced? | |-------------|----------------------|-----------| | Amazon | Pure white RGB (255, 255, 255) | Yes — automated rejection | | Etsy | White or light neutral recommended | Soft enforcement via search ranking | | Shopify | Seller's choice (white recommended) | No enforcement, but converts better | | eBay | White recommended | Soft enforcement | | Walmart Marketplace | Pure white required for main image | Yes — automated review | | Google Shopping | White or transparent required | Yes — feed rejection |
Amazon is the strictest. Their automated systems detect backgrounds that are even a few RGB values off pure white and reject the upload. If you sell on Amazon, your background removal method needs to deliver RGB 255, 255, 255 with no gray edges or color bleeding. For the full breakdown of Amazon's image rules, see our Amazon product image requirements guide.
Common Mistakes and How to Fix Them
Background removal looks simple until you zoom in. These are the artifacts that separate amateur product photos from professional ones.
Halos (White Fringe Around Edges)
The most common artifact. After removing the background, a thin white or light line appears around the product edge. This happens because the original background color bleeds into the edge pixels.
How to fix it:
- In Photoshop: Contract your selection by 1-2 pixels before masking (Select > Modify > Contract).
- In free tools: Look for a "smooth edges" or "refine edge" option. Remove.bg has a built-in edge refinement.
- Prevention: Shoot your product on a high-contrast background (dark product on white, or light product on dark) to create a clean edge for the AI to detect.
Lost Edges (Product Details Cut Off)
Parts of the product disappear with the background. Thin handles, wires, straps, and protruding elements are most vulnerable.
How to fix it:
- In Photoshop: Use "Refine Edge Brush" on the mask to paint back lost details.
- In free tools: Most offer a "restore" brush to manually paint product areas back in.
- Prevention: Ensure your source photo has the entire product clearly visible with good contrast against the background.
Color Fringing (Colored Edge Artifacts)
The product edge takes on the color of the original background — a green tint from a grass background, or a blue tint from a blue wall. This happens because the edge pixels are a blend of product color and background color.
How to fix it:
- In Photoshop: Use "Decontaminate Colors" in the Refine Edge dialog.
- In free tools: Limited options. Re-shoot on a neutral (white or gray) background to avoid the problem.
- Prevention: Always shoot product photos on a white or neutral gray background. Colored backgrounds create color fringing that is difficult to remove completely.
Jagged Edges (Stair-Step Effect)
The product edge looks pixelated and angular instead of smooth. Common with magic wand selections and low-tolerance automatic tools.
How to fix it:
- In Photoshop: Feather the selection by 0.5-1px (Select > Modify > Feather).
- In free tools: Increase the "smoothness" setting if available.
- Prevention: Work with the highest resolution source image possible. Jagged edges are more visible at lower resolutions.
Inconsistent Shadows
After removing the background, the product floats unnaturally without a shadow. Or worse, the original shadow is partially removed, leaving an uneven dark patch beneath the product.
How to fix it:
- Delete the original shadow completely and add a new drop shadow in your editor.
- AI batch tools handle this automatically — they remove the existing shadow and render a new, consistent one.
- Prevention: When shooting, light your product from above and slightly forward. This creates a predictable shadow directly beneath the product, which is easier for both manual and AI tools to handle.
Hard-to-Cut-Out Products: Special Techniques
Some products defeat standard background removal tools. Here is how to handle the most challenging categories.
Hair and Fur Products
Wigs, hair extensions, fur accessories, pet products with visible fur. Fine strands are nearly impossible for automated tools to detect perfectly.
Best method: Photoshop's "Select and Mask" workspace with the Refine Edge Brush. Paint along the hair boundary and Photoshop detects individual strands. For AI tools, shoot against a high-contrast solid background (bright green or blue) to give the algorithm the best chance of detecting fine strands.
Practical tip: Accept that some strand loss is inevitable. Focus on preserving the overall silhouette and the most visible strands. A slightly simplified edge at the hair boundary looks better than a jagged, partially transparent one.
Glass and Transparent Products
Glass bottles, clear phone cases, acrylic displays, transparent packaging. The background shows through the product, so removing it also removes the product's visual properties.
Best method: Do not try to make the glass truly transparent in the output. Instead, shoot the glass product on a white background with controlled lighting so the reflections and refractions look natural against white. Then use a background removal tool that preserves the existing white — you are essentially keeping the background because it is already white.
If you need the product on a non-white background, use AI tools that understand material properties. They can render glass with appropriate transparency, reflections, and refractions for the target scene.
Reflective and Metallic Products
Chrome kitchen appliances, polished jewelry, sunglasses with mirror lenses. These products reflect their surroundings, which means the background appears inside the product.
Best method: Shoot in a controlled environment where the reflections are neutral (white walls, white ceiling, diffused lighting). A lightbox is ideal — it creates soft, even reflections that look natural even after the surrounding background is removed.
For AI batch tools, the AI typically re-renders reflections based on the target environment, which actually produces a more natural result than manually removing the background and leaving the old reflections.
Products with Fine Mesh or Lace
Fabric products with visible holes — lace clothing, mesh bags, woven baskets, chain-link jewelry. The background shows through hundreds of tiny openings.
Best method: For a white final background, shoot on white and skip background removal entirely. The mesh holes already show white, which is what you want.
For non-white backgrounds, this is genuinely one of the hardest background removal challenges. Photoshop's "Select and Mask" with careful edge refinement is the most reliable approach, but expect 30+ minutes per image. AI tools are improving here but have not fully solved it as of 2026.
When to Use Each Method: Decision Guide
You have 1-5 products and unlimited time
Use Photoshop (or the free alternative Photopea) with the pen tool. Take your time, get perfect edges, learn a skill.
You have 5-20 products and a limited budget
Use Remove.bg or PhotoRoom for straightforward products. Fall back to Photoshop for anything the AI tools struggle with (glass, hair, mesh). The free tiers handle low volumes without cost.
You have 20-100 products and need them this week
Use an AI batch tool. Upload everything, select white background, download finished images. The per-image cost is trivial compared to the time you would spend doing it manually. This is where tools like AIOE save days of work — you upload your product photos and get marketplace-ready images with proper backgrounds, lighting, and shadows in minutes rather than hours.
You have 100+ products and launch new ones regularly
AI batch tools are the only practical option. Manual methods at this scale require hiring a retoucher ($25-50/hour) or outsourcing to a retouching service ($1-5/image with 24-48 hour turnaround). AI tools deliver comparable quality instantly at a fraction of the cost.
You sell products with hair, glass, or fine mesh
Start with AI tools for the bulk of your catalog. For the challenging products, use Photoshop's Select and Mask workspace, or shoot those specific products on white so background removal is unnecessary.
Tips for Better Source Photos (Any Removal Method)
No matter which background removal method you choose, the quality of your source photo determines the quality of your result.
- Shoot on a solid, contrasting background. White background for dark products, dark background for light products. Avoid patterned surfaces.
- Light the product evenly. Harsh directional lighting creates deep shadows that confuse removal tools. A lightbox or two diffused lights on opposite sides produce the best results. For a simple home setup, see home studio vs AI photography.
- Keep the entire product in frame. No part of the product should be cut off by the image boundary. Removal tools need to see the complete edge.
- Use the highest resolution your camera offers. More pixels = more edge detail = cleaner removal. Enable "high resolution" or "48MP" mode on your phone camera.
- Avoid motion blur. Use a tripod or stable surface. Even slight blur softens edges and makes clean selection harder.
- Clean your product. Dust, fingerprints, and smudges on the product surface are much harder to remove after background removal than before the photo is taken.
Frequently Asked Questions
What is the fastest way to remove a background from a product photo?
AI-powered tools like Remove.bg, PhotoRoom, and AI batch tools are the fastest — 5 to 60 seconds per image with no manual work. For a single image where you need speed and the product has clean edges against a contrasting background, Remove.bg's free tier works in under 10 seconds. For batch processing dozens or hundreds of images, AI batch tools that handle upload-to-finished-image in one step are the fastest overall workflow.
Can I get a pure white background (RGB 255,255,255) without Photoshop?
Yes. AI background removal tools like Remove.bg and AI product photography tools produce pure white backgrounds automatically. In Photoshop, you need to manually check and adjust the background to hit exactly RGB 255, 255, 255 — which is an extra step many sellers miss. AI tools render the white background mathematically, so it is always perfect. This matters for Amazon, which rejects images where the background is even slightly off-white.
Why does my product have a white halo after background removal?
Halos appear when the original background color bleeds into the semi-transparent edge pixels of your product. The removal tool deletes the background but leaves behind a fringe of blended pixels. To fix this: in Photoshop, contract your selection by 1-2 pixels before masking. In online tools, use the "refine edge" setting. To prevent halos, shoot your product on a background with strong contrast against the product's edge color.
How do I remove the background from a transparent or glass product?
Glass and transparent products are the hardest category for background removal because the background is visible through the product. The best approach is to shoot on a white background with controlled lighting so the glass reflections look natural against white — then you do not need to change the background at all. If you need a different background, use an AI tool that understands material transparency and can re-render the glass with appropriate reflections for the new scene.
Is Remove.bg good enough for Amazon product images?
Remove.bg produces good edge quality for most standard products. The challenge is resolution — the free tier only downloads at approximately 500x500 pixels, which is below Amazon's 1000px minimum. You need to use Remove.bg's paid credits ($0.20+ per image) for full-resolution downloads. The backgrounds are white but may not always be exactly RGB 255, 255, 255 in every area, so verify before uploading to Amazon.
What is the cheapest way to remove backgrounds from product photos in bulk?
For true bulk processing (100+ images), AI batch tools offer the lowest cost per image at $0.10-0.50 each, including not just background removal but complete scene generation with shadows and lighting. Remove.bg's API pricing drops to roughly $0.20 per image at high volume for background removal only. The cheapest option for small volumes (under 20 images) is a free tool like Photopea where you do the work manually at zero cost.
Should I remove the background myself or use AI?
If you process fewer than 5 images per month and have Photoshop experience, manual removal gives you the most control. If you process more than 5 images per month or lack Photoshop skills, AI tools deliver faster results with less effort. For sellers with growing catalogs, AI tools are the clear choice — you can learn the basics of AI product photography in our complete guide, and the time savings compound with every product you add.