Home Studio vs AI Product Photography: Full Comparison 2026
DIY home photography vs AI product photo tools compared side by side. Costs, equipment, time investment, quality, and results for e-commerce sellers in 2026.
TL;DR
A home studio costs $60-200 to set up and takes 20-30 minutes per finished photo. AI tools produce results in 30-60 seconds at $0.10-0.50 per image with no equipment. Home studios win for macro detail and scale-reference shots. AI wins for white backgrounds and lifestyle scenes. The smartest approach: shoot one good photo at home, then let AI generate every style you need.
Key Takeaways
- A functional home photography setup costs $60-200 in equipment and takes 2-4 weeks to master
- Each finished photo at home takes 20-30 minutes including setup, shooting, and editing
- AI product photography requires no equipment and delivers results in 30-60 seconds per image
- Home studios are better for extreme close-ups and scale-reference photography
- AI tools produce more consistent white backgrounds and can generate lifestyle scenes impossible at home
- The hybrid approach -- one real photo plus AI styling -- gives the best results for most sellers
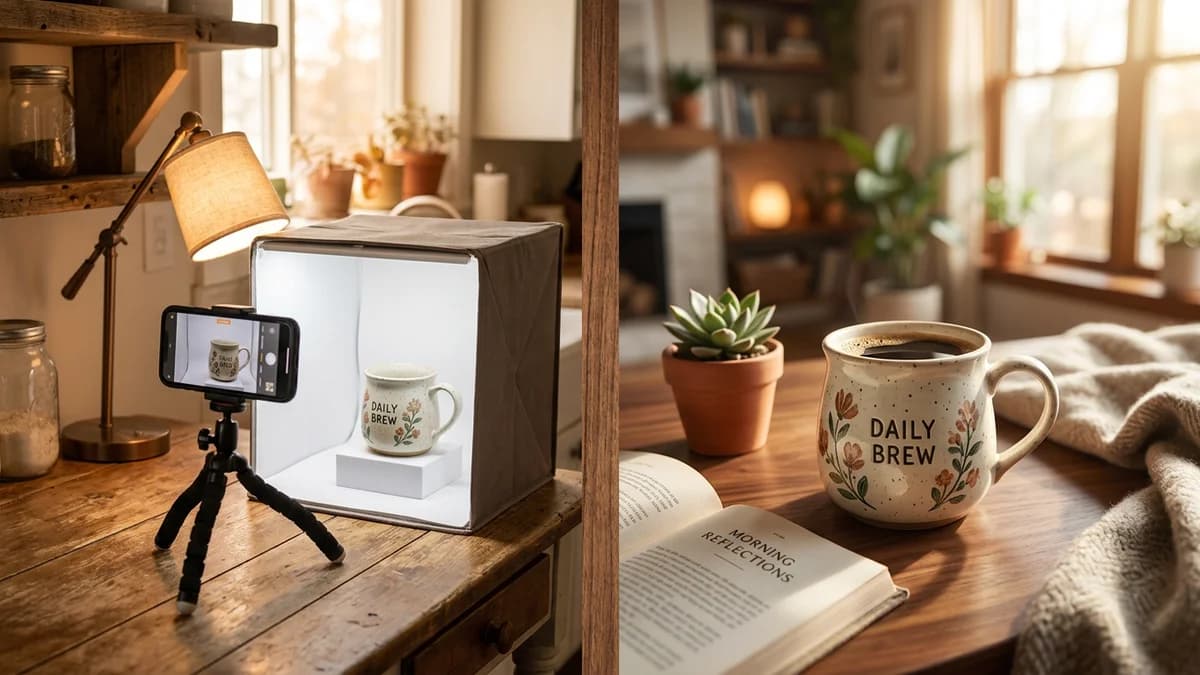
The Home Studio Starter Kit: What You Actually Need
If you search "product photography setup at home" you will find gear lists ranging from $50 to $5,000. Most of those guides are written by photographers who want you to buy professional equipment. Here is what actually works for e-commerce product photos.
Essential Equipment
| Item | Price Range | What to Buy | |------|-------------|-------------| | Lightbox / light tent | $30-80 | 24-inch folding lightbox with built-in LED strips. Covers most small-to-medium products. | | Tripod | $20-40 | Any smartphone-compatible tripod with adjustable height. Skip expensive ones. | | Camera | $0 (your phone) | Any smartphone from the last 3-4 years. The iPhone 14+ or Samsung Galaxy S22+ are more than enough. | | White background paper | $10-15 | Seamless white poster board or craft paper roll. Replace when it gets dirty or creased. | | Editing software | $0-10/mo | Canva (free), Remove.bg (free tier), or Photopea (free Photoshop alternative). | | Extra lighting (optional) | $15-30 | A desk lamp with a daylight LED bulb (5000K-6500K) for fill light. |
Total to get started: $60-200 depending on whether you already own a tripod and whether you go for a basic or premium lightbox.
You do not need a DSLR camera. You do not need a ring light. You do not need Photoshop. Those are upgrades for later if you decide to make photography a core part of your workflow.
Setting Up Your Home Studio
The best location is a table near a window for natural light, or any spot where you can control the lighting. Avoid overhead fluorescent lights -- they create a yellow cast that is difficult to correct in editing.
Place your lightbox on the table, put your product inside, and position your phone on the tripod. The lightbox diffuses light evenly and eliminates most shadows, which is the single biggest challenge in home product photography.
Shoot in your phone's highest resolution mode. Turn off the flash. Use a 2-second timer to avoid camera shake when you tap the shutter button.
The Learning Curve Reality
Here is what nobody tells you about home product photography: getting a clean, consistent white background is harder than it looks.
Common Problems New Sellers Face
Inconsistent backgrounds. Even with a lightbox, the white background can appear gray, yellow, or uneven depending on your lighting and camera settings. You end up spending more time editing backgrounds than shooting.
Shadow control. Shadows add depth, but uncontrolled shadows make products look cheap. Learning where to position your light source relative to the product takes trial and error.
Color accuracy. Your phone's auto white balance often shifts colors. A product that looks navy blue in person might appear black or dark gray in your photo. Manual white balance settings help but require experimentation.
Reflective products. Anything with a glossy surface -- glass bottles, metal electronics, jewelry -- reflects your lightbox, your phone, and your ceiling. Photographing reflective products at home is genuinely difficult without specialized diffusion panels.
Consistency across products. Your first product photo might look great. Your twentieth might look different because the natural light changed, you bumped the tripod, or your background paper is wrinkled. Marketplace algorithms favor listings where all images have a uniform look.
Most sellers spend 2-4 weeks of regular practice before they can produce consistently acceptable results. That is not a criticism -- photography is a real skill, and anyone can learn it. But it is time you should account for.
Time Per Photo at Home
Let's break down the realistic time investment for a single finished product photo.
| Step | First Session | After Practice | |------|---------------|----------------| | Set up lightbox, tripod, and lighting | 15-30 min | 5-10 min | | Position product and adjust angles | 5-10 min | 2-5 min | | Shoot (multiple angles, multiple takes) | 5-10 min | 2-5 min | | Transfer to computer | 2-5 min | 2-5 min | | Background removal / cleanup | 5-10 min | 3-5 min | | Color correction and cropping | 3-5 min | 2-3 min | | Export in correct dimensions | 2-3 min | 1-2 min | | Total per finished photo | 37-73 min | 17-35 min |
After practice, you are looking at roughly 20-30 minutes per finished photo. That includes setup, shooting, and editing.
For a product listing that needs 7 images (Amazon's maximum), that is 2-3.5 hours of work per product. If you have 50 products, that is 100-175 hours -- or roughly 3-4 weeks of full-time work.
How AI Product Photography Works
The AI approach is fundamentally different. There is no studio, no lighting, no editing phase.
- Upload a photo of your product. A clear phone photo from any angle. Even a photo on your kitchen counter works.
- Select a photography style. White background, lifestyle scene, flatlay composition, editorial lighting, or a custom scene.
- Wait 30-60 seconds. The AI analyzes your product's shape, color, material, and texture, then renders it into the selected scene with proper lighting, shadows, and reflections.
- Download the finished image. Ready for your marketplace listing.
No tripod. No lightbox. No background removal. No color correction.
What AI Costs
Most AI product photography tools charge between $0.10 and $0.50 per image depending on resolution and style complexity. Some tools offer subscription plans with monthly credits. See AIOE pricing for current plan details. For a detailed comparison of tools and pricing, see our best AI product photo tools roundup.
There is no equipment to buy. No software to learn. No studio space to maintain. For the full cost breakdown between AI and professional studios, read AI vs traditional product photography.
Quality Comparison: Home Studio vs AI
Neither approach wins in every scenario. Here is an honest breakdown by use case.
White Background Product Shots
Winner: AI.
A pure white background (RGB 255, 255, 255) is required for Amazon main images and expected on most marketplaces. Getting a truly white background at home requires careful lighting, proper exposure settings, and post-processing cleanup.
AI generates a mathematically perfect white background every time. No gray edges, no shadows bleeding into the background, no color cast. The product sits cleanly with natural-looking drop shadows that you control. Tools like AIOE handle this automatically from a single product photo.
If white background shots are your primary need, AI is objectively faster, cheaper, and more consistent.
Lifestyle and Contextual Scenes
Winner: AI.
Lifestyle photos show your product in context -- a candle on a living room shelf, a skincare bottle in a bathroom setting, a kitchen gadget on a marble countertop. Creating these scenes at home means buying props, styling the set, and managing complex lighting across a larger area.
AI generates these scenes from a text description. "Product on a marble bathroom counter with soft morning light and eucalyptus branch in the background" produces exactly that. You can test 10 different scenes in the time it takes to set up one physical scene.
Extreme Close-Up and Texture Shots
Winner: Home studio.
If your product's selling point is its texture -- hand-stitched leather, woven fabric, wood grain, the bubbles in a bar of soap -- a real macro photo taken at home captures detail that AI currently approximates but does not perfectly replicate.
AI models are improving here rapidly, but as of early 2026, real macro photography still wins for texture accuracy.
Scale and Size Reference Images
Winner: Home studio.
Photos showing your product next to a coin, a hand, or a common household object for size reference are best done with real photography. AI can generate hands holding products, but the size relationship is not always accurate and customers may find it uncanny.
Consistency Across a Large Catalog
Winner: AI.
If you sell 50+ products and need every image to share the same lighting, angle, and style, AI delivers perfect consistency. Home photography varies between sessions -- the light changes, the camera angle shifts, backgrounds age.
The Cost Comparison Table
Here is what each approach costs at different scales, including both time and money.
| Scale | Home Studio Cost | Home Studio Time | AI Cost | AI Time | |-------|-----------------|------------------|---------|---------| | 10 products (5 images each) | $60-200 (equipment) + 17-29 hrs labor | 17-29 hours | $5-25 | 25-50 min | | 50 products (5 images each) | $60-200 (equipment) + 83-146 hrs labor | 83-146 hours | $25-125 | 2-4 hours | | 200 products (5 images each) | $80-250 (equipment, replacements) + 333-583 hrs labor | 333-583 hours | $100-500 | 8-17 hours |
At the 10-product level, home photography is affordable if you value your time at $0. The equipment cost is a one-time investment, and the learning experience has value.
At 50+ products, the math overwhelmingly favors AI. Even if you value your time at minimum wage, the home studio approach costs thousands of dollars in labor.
The Hybrid Approach: Best of Both Worlds
The smartest sellers in 2026 are not choosing one or the other. They are combining both.
The workflow:
- Take one clear, well-lit photo of your product at home. Focus on capturing the real colors, textures, and details accurately.
- Upload that photo to an AI tool.
- Generate your white background main image, lifestyle scenes, flatlay compositions, and seasonal variants -- all from that single source photo.
- For products where texture or scale matters, keep your real macro shots and size-reference photos alongside the AI-generated images.
This approach gives you the authenticity of real photography (your source image captures what the product actually looks like) combined with the speed and versatility of AI (multiple professional styles from one photo).
You spend 5-10 minutes taking one good photo instead of 20-30 minutes per finished image. Then AI handles the rest.
Decision Framework: Which Approach Is Right for You?
Use a home studio if:
- You sell fewer than 10 products and want to learn photography as a skill
- Your products are best represented by extreme close-up texture shots (handmade goods, artisan crafts)
- You need precise scale-reference images with real objects for comparison
- You enjoy the creative process and have time to invest in learning
- Your product category is food or beverage (real photography still leads here)
Use AI product photography if:
- You sell 20+ products and need images fast
- White backgrounds and lifestyle scenes are your primary image types
- You launch new products frequently and cannot afford multi-week photo turnaround
- You want to test different styles (seasonal, editorial, minimalist) without reshooting
- Consistency across your catalog matters for your brand
- You are spending more time editing photos than running your business
Use the hybrid approach if:
- You want the most professional results regardless of method
- You sell a mix of products where some benefit from real photography and others from AI
- You are scaling from a small catalog to a larger one
- You want real source photos for authenticity but AI-generated styles for variety
Tips for Getting the Best Results from Either Approach
Home Studio Tips
- Shoot during the same time each day for consistent natural light.
- Use two light sources on opposite sides of your product to minimize shadows.
- Tape your background paper to the table so it does not shift between shots.
- Take more photos than you think you need. Storage is free. Shoot 10-15 per product and pick the best.
- Batch your editing. Edit all photos from one session together for consistent results.
AI Photography Tips
- Start with the clearest source photo you can get. Better input produces better output.
- Remove distracting backgrounds before uploading if possible -- even a rough crop helps.
- Try multiple styles for each product. AI is fast enough to generate 5-10 options and let you pick.
- Check AI output against your real product for color accuracy before publishing.
- Generate all images for one product in the same session for stylistic consistency.
Frequently Asked Questions
Can I use my phone for home product photography?
Yes. Smartphones from the last 3-4 years have cameras that are more than capable of producing marketplace-quality product images. The key factors are lighting and stability (use a tripod), not camera hardware. Many successful Amazon sellers shoot exclusively with their phones.
How much does a basic home photography setup cost?
A functional setup costs $60-200. The essentials are a lightbox ($30-80), a tripod ($20-40), white background paper ($10-15), and your smartphone. Optional additions like an extra lamp or editing software subscription bring the total to the higher end of that range.
Is AI product photography allowed on Amazon?
Yes. Amazon's image requirements focus on technical specifications -- resolution, background color, file format, and product visibility. They do not prohibit AI-generated images. Many sellers use AI for both main listing images and secondary lifestyle shots. The images must accurately represent the product, which means your source photo needs to be genuine.
How long does it take to learn home product photography?
Most sellers need 2-4 weeks of regular practice to produce consistently acceptable results. The biggest challenges are achieving a clean white background, controlling shadows, and maintaining color accuracy. If you have any photography experience, the learning curve is shorter. If you are starting from scratch, expect some trial and error.
Can AI replace all my product photos?
For most e-commerce sellers, AI can handle 80-90% of your product image needs -- white backgrounds, lifestyle scenes, flatlay compositions, and seasonal variants. The remaining 10-20% might include extreme close-up texture shots, scale-reference images, or specialized photography like food styling. The hybrid approach covers all scenarios.
What if my AI-generated images do not match my real product?
Color accuracy depends on your source photo. If your input image has accurate colors and good lighting, the AI output will closely match. Always compare AI-generated images against your physical product before publishing. Most AI tools let you adjust settings if the initial result is off.
Is it worth investing in a home studio if I plan to use AI?
A minimal home setup (tripod + good lighting) is worth having even if you primarily use AI. You still need to take the initial source photos that AI works from, and better source photos produce better AI output. You do not need a full lightbox setup -- a clean surface, good natural light, and a stable phone mount are enough to capture quality source images.