How to Take Product Photos with iPhone: Complete Guide 2026
Take stunning product photos iPhone style with this step-by-step guide. Covers camera settings, lighting, backgrounds, editing apps, and AI upgrades.
TL;DR
Any iPhone from the 12 series onward produces images sharp enough for e-commerce listings. The keys to professional results are lighting (window light or two cheap LED panels), a clean white background (foam board or poster paper), and a tripod to eliminate camera shake. Shoot in ProRAW on Pro models for maximum editing flexibility, or use the standard Camera app with exposure lock and grid enabled. Edit in Lightroom Mobile or Snapseed (both free). A complete iPhone product photography setup costs under $100 and produces images that meet Amazon, Shopify, and Etsy requirements.
Key Takeaways
- iPhone 12 and newer models produce images at resolutions that exceed marketplace minimums (1000px+)
- ProRAW format on Pro models captures more detail for editing -- use it for white background shots that need color correction
- Two cheap LED panels ($15-30 each) or a single window produce better results than any ring light or flash
- A foam board sweep (white poster board curved against a wall) creates a seamless white background for under $5
- Exposure lock and manual focus prevent the iPhone from adjusting settings between shots, keeping your images consistent
- Lightroom Mobile (free) and Snapseed (free) handle 90% of the editing most sellers need
iPhone Camera Settings for Product Photography
The iPhone's default camera settings are designed for snapshots -- faces, landscapes, quick moments. Product photography needs different settings.
Essential Settings to Change
Turn on the grid. Go to Settings > Camera > Grid. This shows a 3x3 grid overlay that helps you center products and keep lines straight. Use it for every shot.
Turn off Live Photos. Live Photos adds a short video clip to each image, which increases file size without adding value for product listings. Tap the Live Photos icon (the concentric circles) in the Camera app to disable it.
Turn off Smart HDR / Photographic Styles. These features automatically adjust tone, contrast, and saturation. For product photography, you want the most neutral, accurate representation of your product. Go to Settings > Camera and turn off Smart HDR. Set Photographic Styles to "Standard" if your iPhone has the option.
Set to highest resolution. On iPhone 15 Pro and later, you can shoot at 48MP. Go to Settings > Camera > Formats and enable ProRAW or HEIF Max. For older models, the default resolution is sufficient.
ProRAW: When to Use It
ProRAW (iPhone 12 Pro and later Pro models) captures a DNG raw file with more color and exposure data than JPEG or HEIF. Use it for white background images that need precise cleanup and products where color accuracy is critical (cosmetics, paint, fabric). Skip it for lifestyle shots or when storage is a concern (ProRAW files are 25-75MB each). Enable at Settings > Camera > Formats > Apple ProRAW.
Exposure Lock and Manual Focus
The iPhone continuously adjusts exposure and focus as you move the camera. For product photography, this means each shot can look slightly different in brightness and sharpness.
How to lock exposure and focus:
- Frame your product on screen
- Tap and hold on the product until you see "AE/AF Lock" appear at the top
- The camera will not readjust until you tap somewhere else
This ensures every photo in a batch has identical exposure. It is the single most impactful setting change for consistency.
Adjusting exposure after locking: After locking, slide your finger up or down to adjust the exposure compensation. For white background shots, slide up slightly (+0.3 to +0.7) to keep the white background bright without blowing out the product.
Lighting Setup
Lighting determines 80% of your image quality. An expensive camera with bad lighting produces worse results than a budget phone with good lighting.
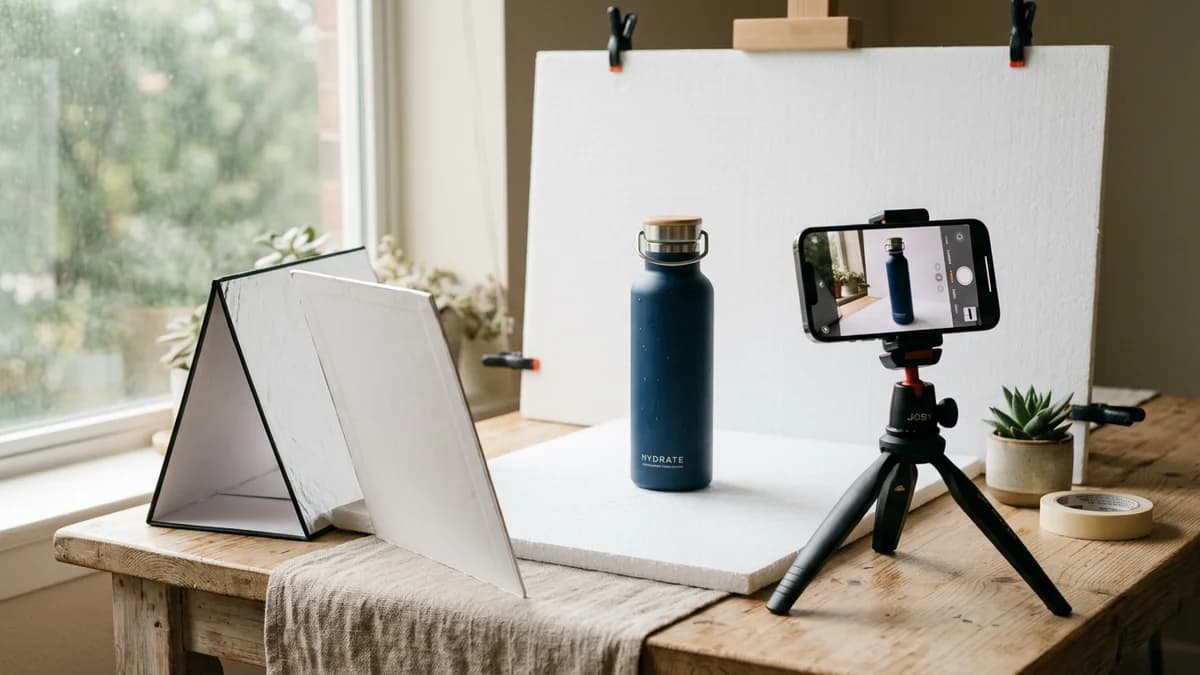
Option 1: Window Light (Free)
Natural window light is the easiest and best free lighting source for product photography.
Setup:
- Place a table next to a large window (north-facing is ideal -- it provides consistent, diffused light without direct sun)
- Position the product so the window light hits it from one side (roughly 45 degrees)
- Place a white foam board on the opposite side of the product to bounce light back into the shadows
When it works: Daytime, overcast days (overcast clouds act as a giant diffuser), rooms with large windows.
When it does not work: Evening, rooms with small windows, direct sunlight streaming in (creates harsh shadows and hot spots).
Option 2: Continuous LED Panels ($30-60 Total)
Two LED panels give you complete control and work any time of day.
| What to Buy | Price | Specs to Look For | |------------|-------|-------------------| | LED video light panel (x2) | $15-30 each | 5500K-6500K (daylight), dimmable, 120+ LED count | | Light stands or clamps (x2) | $10-15 each | Any adjustable stand; desk clamps work too | | Diffusion material (optional) | $5-10 | White translucent fabric, parchment paper, or shower curtain |
Setup:
- Place one LED panel at 45 degrees to the left of the product, slightly above
- Place the second LED panel at 45 degrees to the right, slightly lower or at equal height
- If shadows are too harsh, put diffusion material between the light and the product
- Keep both lights at the same color temperature (5500K-6500K)
This two-light setup eliminates most shadows and provides even illumination across the product. It is the same principle that professional studios use, scaled down.
Option 3: DIY Lightbox ($30-80)
A 24-inch folding lightbox with built-in LED strips ($30-80) produces very even, shadow-free lighting with minimal setup. Limitations: does not fit products larger than about 12 inches, built-in LEDs are weaker than standalone panels, and reflective products will show the lightbox walls.
What NOT to Use
Phone flash -- harsh, direct light that creates hard shadows. Ring lights -- designed for faces, not products; they create unnatural circular catchlights. Overhead room lights -- fluorescent and tungsten ceiling lights produce color casts that are difficult to correct. Turn them off and use only your controlled light sources.
Backgrounds
The Foam Board Sweep
The cheapest and most effective white background is a piece of white foam board or poster paper curved into a sweep.
How to build it:
- Get a large white foam board or poster paper ($3-5 at any craft store)
- Lean it against a wall or box so it curves smoothly from vertical to horizontal -- do not crease it
- Place your product on the horizontal section, far enough forward that the curve is behind and below the product
This creates a seamless white background with no visible horizon line. It is what professional studios use, just at smaller scale.
Replace the paper when it gets dirty, scuffed, or creased. At $3-5 per sheet, this is disposable.
Other Background Options
| Background | Best For | Cost | |-----------|----------|------| | White foam board sweep | White background hero images, marketplace compliance | $3-5 | | Black foam board | Dramatic product shots, reflective items | $3-5 | | Wood board / shelf | Lifestyle feel for home goods, artisanal products | $10-20 | | Marble contact paper on board | Premium look for cosmetics, jewelry, food | $8-15 | | Colored poster board | Brand-colored backgrounds for social media | $2-3 |
For Amazon main images, you need a pure white background (RGB 255,255,255). A foam board sweep gets you close, but you will likely need to brighten the background in editing. For details on what Amazon requires, see our Amazon image requirements guide.
Composition Rules
The Rule of Thirds
With the grid enabled (you turned it on earlier), place the product at the intersection of grid lines rather than dead center. This creates a more visually appealing composition, especially for lifestyle and social media images.
For marketplace hero images (white background), center the product and fill 85% of the frame. The rule of thirds applies more to lifestyle and secondary images.
Fill the Frame
The most common mistake in iPhone product photography is leaving too much empty space around the product. Your product should fill at least 75-85% of the frame for hero images. Get closer to the product or use the 2x optical zoom (available on most modern iPhones) rather than cropping later.
Shoot at Eye Level
For most products, position the iPhone at the same height as the product's center. This is the most natural and flattering angle. Avoid shooting down at the product from above unless you specifically want a top-down flatlay composition.
Multiple Angles
Every product listing needs multiple angles. Shoot at minimum:
- Front (hero angle)
- Back
- Both sides (if different)
- Top-down
- 45-degree angle (three-quarter view)
- Detail shots (texture, labels, buttons, closures)
Aim for 15-20 raw shots per product. You will select the best 7-9 for your listing.
Tips by Product Type
Small items (jewelry, electronics, cosmetics): Use the 2x or 3x optical zoom instead of getting too close. Place items on a slightly elevated surface to bring them to camera height. Use poster tack or museum wax to hold jewelry in position.
Clothing and apparel: Flat lay on a white surface shot from directly above is the easiest approach. Steam or iron garments before shooting -- wrinkles are the most common issue. For a more premium look, use a clothing form ($20-40).
Food and beverage: Use natural window light -- LED panels can make food look flat. Shoot within 10 minutes of plating. Style from above (top-down) or at 45 degrees.
Large products: Stand farther back and use the 1x lens to avoid perspective distortion. Include a size reference in at least one shot. Use a clean wall or large white sheet as background.
Editing Apps
You do not need Photoshop. These free apps handle everything most sellers need.
Lightroom Mobile (free) is the best overall option. It handles white balance correction, exposure adjustment, selective editing (brighten only the background), batch presets for consistency, and custom resolution export.
Snapseed (free) has a simpler interface. Use Tune Image for exposure and contrast, White Balance for color correction, the Selective tool for area adjustments, and the Healing tool for removing dust spots.
Background removal requires separate tools. Remove.bg (free tier), Photopea (free, browser-based), and Apple's built-in subject isolation (iOS 16+: tap and hold on a subject in the Photos app) all work. For more options, see our background removal guide.
The Batch Workflow
Shooting one product at a time is inefficient. Batch your work into three phases:
Preparation (15-20 minutes, once per session). Set up background, position lights, mount iPhone on tripod, take a test shot, lock exposure and focus (AE/AF Lock).
Shooting (3-5 minutes per product). Place the product, shoot front/side/back/three-quarter/top-down angles plus 1-2 detail close-ups, then move to the next product without changing any settings.
Editing (5-10 minutes per product). Import all photos to Lightroom Mobile, edit the first product (exposure, white balance, crop), copy the settings and paste to all remaining photos, fine-tune as needed, export.
A single 2-hour session produces finished images for 10-15 products -- about 70-135 final images.
When iPhone Photos Are Not Enough
iPhone product photography has limits. Here is when you need to upgrade.
Signs You Have Outgrown iPhone Photography
- Your catalog has grown past 50 products and DIY is a bottleneck
- You need lifestyle images with props and styled scenes
- Your white backgrounds require 15+ minutes of editing per image to reach pure white
- Your catalog looks visually inconsistent across products
Upgrading to AI Photography Tools
AI product photography tools solve the limitations of iPhone photography without the cost of a studio.
The workflow: shoot one clean product photo with your iPhone using the techniques in this guide. Upload it to an AI photography tool like AIOE. The AI generates professional white background images, lifestyle scenes, and editorial compositions from that single source image.
This hybrid approach gives you the authenticity of a real product photo (you shot it, it is your actual product) with the production quality and variety of a professional studio. For a complete guide to AI product photography, see our AI photography guide.
The Hybrid Approach
The most cost-effective strategy for growing sellers:
- Shoot source images with your iPhone. One good photo per product using the techniques in this guide.
- Use AI to generate your full image set. White background, lifestyle, flatlay, editorial -- all from that single source image.
- Reserve manual photography for special cases. Extreme close-ups, scale-reference shots, and unboxing images that benefit from physical context.
This approach costs $100 for equipment (one-time) plus $10-50/month for AI tools (see AIOE pricing). It produces professional results at a fraction of the cost and time of either pure DIY or pure studio photography. For a full cost breakdown, see our product photography cost comparison.
Frequently Asked Questions
Which iPhone model is best for product photography?
Any iPhone 12 or later is sufficient. The 15 Pro and 16 Pro add ProRAW, 48MP, and better optical zoom, but an iPhone 12 or 13 exceeds marketplace requirements.
Do I need a tripod for iPhone product photography?
Yes. It eliminates camera shake, keeps framing consistent across products, and lets you use the timer to avoid bumping the phone. Any $20-40 tripod with a phone mount works.
How do I get a pure white background with an iPhone?
Shoot on a white foam board sweep with bright, even lighting. Slightly overexpose the image (+0.3 to +0.7 exposure compensation). Then brighten the background in Lightroom Mobile using the selective editing tool or by raising the highlights slider. For marketplace-compliant pure white (RGB 255,255,255), you may need to use a background removal tool.
Can I use portrait mode for product photos?
Portrait mode applies a simulated depth-of-field blur (bokeh) to the background. This works well for lifestyle and social media images where you want the product to stand out from a styled background. Do not use portrait mode for white background marketplace images -- the artificial blur can create artifacts around the product edges.
What resolution should I export at for Amazon?
Amazon's minimum is 1000px on the longest side, but 1600px or more is recommended for zoom functionality. iPhone photos natively capture at 4032x3024px (12MP) or higher, so you already exceed the minimum. Export at 2000-2500px on the longest side for the best balance of quality and file size.
How do I photograph products with reflective surfaces?
Reflective products (glass, chrome, polished metal) are the hardest category to photograph. Use diffused lighting (softbox, translucent panel, or lightbox) placed above and to the sides. Cover everything the product might reflect (including your phone and tripod) with white or black cards. Consider a matte spray for extremely reflective items, but test on a hidden area first.